How To Send Emails Using Nest.js, Nodemailer, SMTP, Gmail, and OAuth2

Sending emails with Gmail API used to be much less of a hassle with the not-too-good old "enable less secure app access" of Google account settings which allow the use of a Gmail username and password to authenticate Gmail API for sending emails, it's pretty easy to setup but doesn't use modern security standards such as OAuth, thereby increasing the risk of accounts and devices being compromised. Google no longer supports the use of third-party apps or devices which ask you to sign in to your Google Account using only your username and password.
In sending emails in Node.js applications, Nodemailer is a go-to library. You can use it directly in the Nest.js framework but a mailer module for Nest.js is the recommended way of working with Nodemialer.
Create a Google Project
There are now modern secure ways Google lets you give third-party apps and services access to different parts of your Google Account. To be able to use Gmail API for sending emails, a Google project is required in creating API credentials for accessing the Gmail API. To create a project head over to the Google developer console to create one.
Once at the console, click the upper left dropdown and click on NEW PROJECT.


Enter a name for the project and click on CREATE.
Creating OAuth 2.0 API Credentials
In contrast to less secure app access, OAuth uses credentials to give access to Google Accounts, which can be deleted at any given time instead of using a Google username and password. Before creating credentials you might have to set up an OAuth consent screen for this project if it has not been created before.
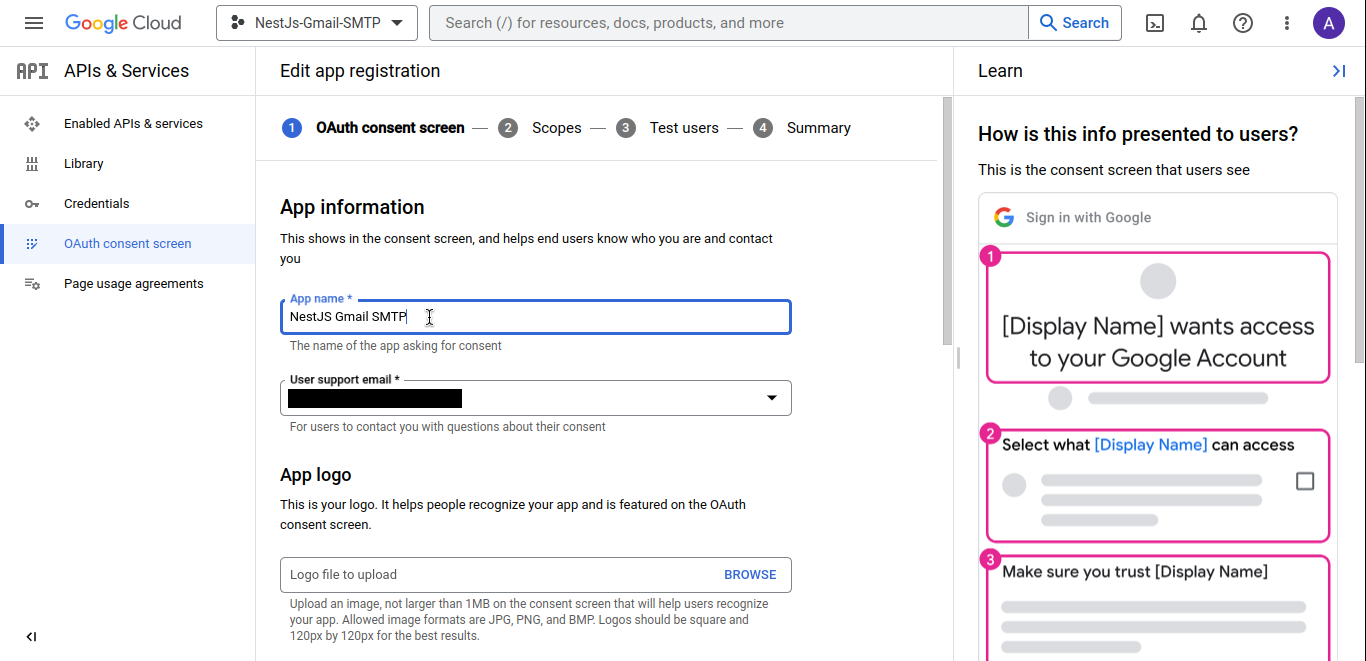
Click on the hamburger menu and "APIs and Service" and then click on "OAuth consent screen".

Select External as the user type for the consent screen and fill in other required fields. and head back to the credentials.
To create new credentials click on "Credentials" on the sidebar then click on "CREATE CREDENTIALS", and click "OAuth Client ID".

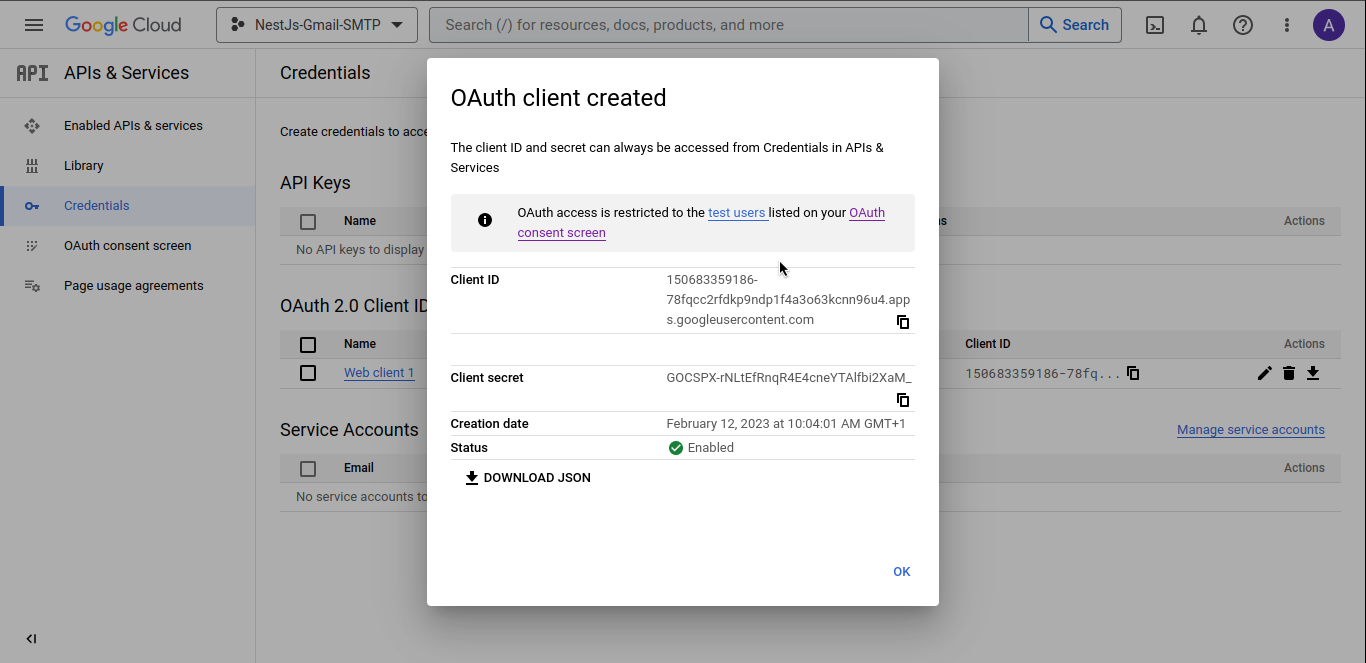
In the "Application type" dropdown select "Web application", and in the "Authorized redirect URIs" section, make sure to add https://developers.google.com/oauthplayground. Then click CREATE!

Copy both the Client ID and Client secret somewhere safe for later use.
On the left click on "Enable APIs and services" and click on "ENABLE APIS AND SERVICES".

Find the "Gmail API" under Google Workspace click it and enable it.

OAuth 2.0 Playground
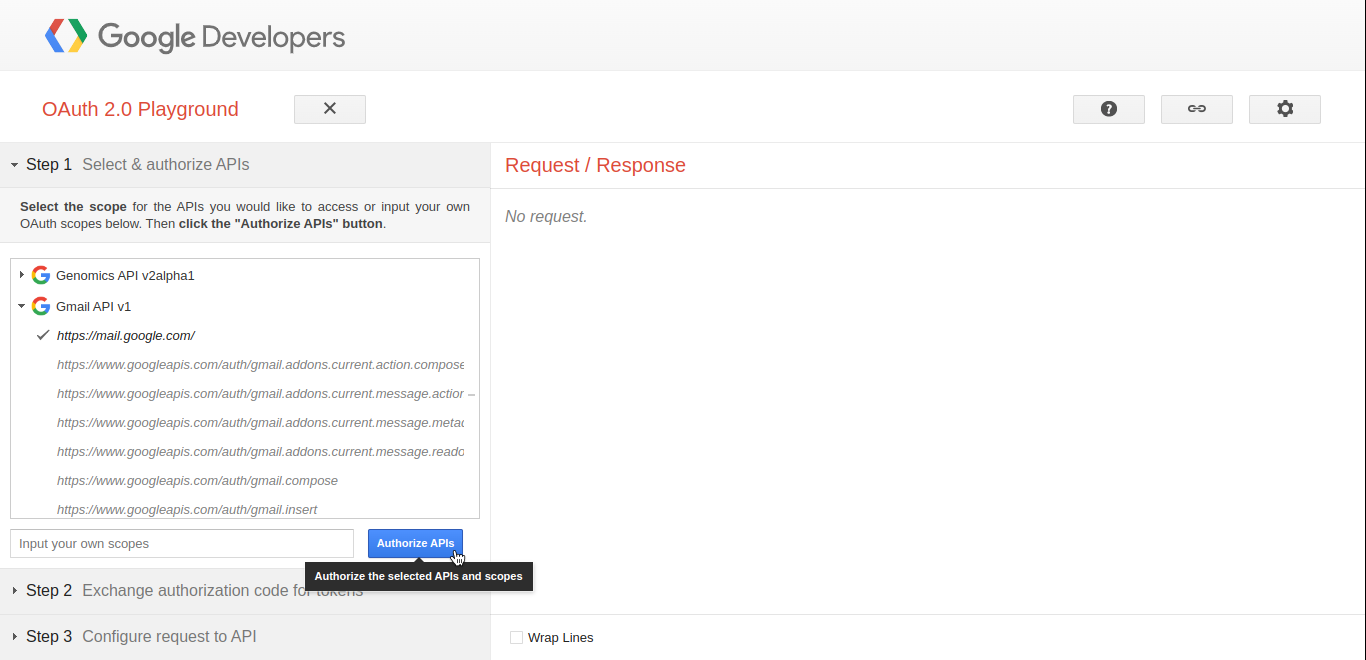
To be able to use our Gmail SMTP with OAuth credentials, we will need both access and refresh tokens. We can generate these with OAuth playground. Start by visiting https://developers.google.com/oauthplayground. Once on the page, click the gear icon on the upper right of the page, and check the "Use your own OAuth credentials" box. Then paste in the client id and secret from before.

On the left, under the Select & authorize APIs section, find "Gmail API v1" and select "https://mail.google.com". Alternatively, you can also type "https://mail.google.com" into the Input your own scopes field. Now click "Authorize APIs".
After clicking on "Authorize APIs", we'll be required to sign in with our Google account. click "Continue" so that Google OAuth 2.0 Playground has access to your Google account.

Note: If you receive a response code of 403, you can either add your email to the "Test users" of the OAuth consent screen or set the publishing status of the OAuth consent screen to "Production".
After being redirected back to the OAuth 2.0 Playground, click the "Exchange authorization code for tokens" button under the Exchange authorization code for tokens section. Once the refresh and access token is generated, copy the refresh token and save it for later. Due to how OAuth works, access tokens take a relatively shorter amount before they expire, however, we can use the refresh token to generate a new access token to make API requests.

Writing Code
Head over to the Nest.js docs first-setups page on how to quickly set up a Nest.js project. We now have the client id, client secret and a refresh token to make calls to Gmail API and send emails. We need to add a mailer module for Nest.js (Node.js) which uses the Nodemailer library.
npm install --save @nestjs-modules/mailer nodemailer
npm install --save-dev @types/nodemailer
npm install --save handlebars
#or
pnpm i @nestjs-modules/mailer nodemailer
pnpm i -D @types/nodemailer
pnpm i handlebars
Hint: handlebars is an optional dependency, if you want to use the template, you must install it.
We'll also be needing the googleapis library which will be used to dynamically generate access tokens and the @nestjs/config library for easily working with environment variables.
pnpm i @nestjs/config googleapis
Create a module where all mailing components will reside. you can create a module in Nest.js manually but with Nest.js CLI we can quickly generate one. We can also generate both controller and service for our MailingModule.
nest g module mailing
nest g controller mailing
nest g service mailing
import { Module } from '@nestjs/common';
import { MailingService } from './mailing.service';
@Module({
  providers: []
})
export class MailingModule {}
import { Injectable } from '@nestjs/common';
@Injectable()
export class MailingService {}
import { Controller } from '@nestjs/common';
@Controller('mailing')
export class MailingController {}
/src/mailing/mailing.module.ts, /src/mailing/mailing.service.ts, /src/mailing/mailing.controller.ts
In our MailingModule we need to add both MailingService and ConfigService to the providers array of our MailingModule.
import { Module } from '@nestjs/common';
import { ConfigService } from '@nestjs/config';
import { MailingService } from './mailing.service';
import { MailingController } from './mailing.controller';
@Module({
  providers: [MailingService, ConfigService],
  controllers: [MailingController],
})
export class MailingModule {}
/src/mailing/mailing.module.ts
To be able to use both the services of MailerModule and ConfigModule in our entire application, they have to be added to the imports array of the AppModule.
import { Module } from '@nestjs/common';
import { AppController } from './app.controller';
import { AppService } from './app.service';
import { MailingModule } from './mailing/mailing.module';
import { ConfigModule } from '@nestjs/config';
import { MailerModule } from '@nestjs-modules/mailer';

import { HandlebarsAdapter } from '@nestjs-modules/mailer/dist/adapters/handlebars.adapter';

@Module({
  imports: [
    MailingModule,
    ConfigModule.forRoot({
      isGlobal: true,
    }),
    MailerModule.forRoot({
      transport: 'smtps://user@domain.com:pass@smtp.domain.com',
      template: {
        dir: process.cwd() + '/templates/',
        adapter: new HandlebarsAdapter(),
        options: {
          strict: true,
        },
      },
    }),
  ],
  controllers: [AppController],
  providers: [AppService],
})
export class AppModule {}
src/app.module.ts
In MailingService is where we'll keep the logic for sending emails, we'll be needing some environment variables including CLIENT_ID, CLIENT_SECRET and REFRESH_TOKEN . Create .env file in the root of the project and past the client id, client secret and refresh the token copied earlier.
CLIENT_ID=PASTE_CLIENT_ID_HERE
CLIENT_SECRET=PASTE_CLIENT_SECRET_HERE
REFRESH_TOKEN=PASTE_REFRESH_TOKEN_HERE
EMAIL=YOUR_GOOGLE_EMAIL_HERE
To be able to use the MailService and ConfigService in our MailingService they need to be injected using the costructor of our MailingService.
import { Injectable } from '@nestjs/common';
import { ConfigService } from '@nestjs/config';
import { MailerService } from '@nestjs-modules/mailer';
import { google } from 'googleapis';
import { Options } from 'nodemailer/lib/smtp-transport';
@Injectable()
export class MailingService {
  constructor(
    private readonly configService: ConfigService,
    private readonly mailerService: MailerService,
  ) {}
}
In our MailingService we will create a private async function setTransport that creates a transport for sending our emails. But before creating our transport, we need to get a new access token needed by our nodemailer transport.
We first create an OAuth2 client object from google imported by using both the client id and the client secret from the environment variables using the configService earlier injected. And set the refresh_token using the setCredentials function, and make a Promise to get a new accessToken required for our Gmail transport. We can use the injected mailerService to call the addTransporter function to add a new transporter by giving it a name and a config, which can be used for sending emails.
  private async setTransport() {
    const OAuth2 = google.auth.OAuth2;
    const oauth2Client = new OAuth2(
      this.configService.get('CLIENT_ID'),
      this.configService.get('CLIENT_SECRET'),
      'https://developers.google.com/oauthplayground',
    );

    oauth2Client.setCredentials({
      refresh_token: process.env.REFRESH_TOKEN,
    });

    const accessToken: string = await new Promise((resolve, reject) => {
      oauth2Client.getAccessToken((err, token) => {
        if (err) {
          reject('Failed to create access token');
        }
        resolve(token);
      });
    });

    const config: Options = {
      service: 'gmail',
      auth: {
        type: 'OAuth2',
        user: this.configService.get('EMAIL'),
        clientId: this.configService.get('CLIENT_ID'),
        clientSecret: this.configService.get('CLIENT_SECRET'),
        accessToken,
      },
    };
    this.mailerService.addTransporter('gmail', config);
  }
To send emails we will first call the private async function setTransport and then use the injected function of mailerService.sendMail and pass an object of options. The complete list of the options can be found at https://nodemailer.com/message/. In the MailingService let's create a function that shows this in action, and call it from our MailingController .
public async sendMail() {
    await this.setTransport();
    this.mailerService
      .sendMail({
        transporterName: 'gmail',
        to: 'dummy-reciever@gmail.com', // list of receivers
        from: 'noreply@nestjs.com', // sender address
        subject: 'Verficiaction Code', // Subject line
        template: 'action',
        context: {
          // Data to be sent to template engine..
          code: '38320',
        },
      })
      .then((success) => {
        console.log(success);
      })
      .catch((err) => {
        console.log(err);
      });
  }
In our MailingController we can create an endpoint to test our simple email using an action.hbs template in our template folder. In our MailingController we can inject our mailingService and call the sendMail function for testing.
import { Controller, Get } from '@nestjs/common';
import { MailingService } from './mailing.service';

@Controller('mailing')
export class MailingController {
  constructor(readonly mailingService: MailingService) {}
  @Get('send-mail')
  public sendMail() {
    this.mailingService.sendMail();
  }
}
Check dummy's email inbox 😁.

For reference, the full code can be found here.


